Chapter 20: Crafty Game UI
Chapter 15 covered the engine's UI philosophy — DOM over the WebGPU canvas — and the pre-game start screen. This chapter walks the concrete in-game screens the player actually touches while playing Crafty: the main screen (the always-on HUD and control row), the inventory hotbar, the inventory menu, the system menu, and the minimap. Every one of them lives in crafty/ui/ and is built from plain DOM elements — there is no separate UI renderer.
20.1 The UI Layer#
Crafty's interface is a stack of DOM elements layered over the single full-screen WebGPU <canvas>. Each widget is created imperatively, styled with an inline cssText, and appended to document.body. There is no framework, no virtual DOM, and no per-frame allocation — the game loop only writes textContent (and a few transforms) on elements that already exist.
The whole UI lives in one directory:
| Module | Screen |
|---|---|
crafty/ui/start_screen.ts |
Pre-game launcher (world list, network connect) — see Chapter 15 |
crafty/ui/hud.ts |
The main screen: reticle, clock, debug overlay |
crafty/ui/hotbar.ts |
The inventory hotbar + the on-screen control buttons |
crafty/ui/block_manager.ts |
The inventory menu (block picker + draggable hotbar) |
crafty/ui/menu.ts |
The modal primitive behind the system menu and inventory menu |
crafty/ui/control_panel.ts |
The settings controls mounted inside the system menu |
crafty/ui/minimap.ts |
The north-up minimap |
crafty/ui/chat.ts |
The multiplayer chat box (see Chapter 23) |
The single most important layout rule is pointer-events routing. The game runs under pointer lock: while playing, the mouse drives the camera, not a cursor. So passive overlays (the reticle, the minimap panel, the clock, the debug text) are marked pointer-events:none — clicks fall straight through them to the canvas and never steal a block-place or a camera turn. Only genuinely interactive controls (the hotbar buttons, the minimap zoom buttons, menu cards) opt back in with pointer-events:auto.

// ── from crafty/ui/minimap.ts — the panel never eats game input ──
'pointer-events:none', 'overflow:hidden', 'z-index:5',
// ...the zoom buttons sit inside it and re-enable pointer events:
'display:flex', 'gap:4px', 'pointer-events:auto',
Opening a menu is the one moment the model changes: the menu releases pointer lock so the OS cursor reappears and the player can click buttons; closing it re-acquires lock and drops them straight back into the game (§20.5).
20.2 The Main Screen#
The "main screen" is the always-on gameplay HUD, assembled once by createHud() in crafty/ui/hud.ts. It returns a struct of element handles the game writes to each frame:
// ── from crafty/ui/hud.ts ──
export interface HudElements {
  fps: HTMLDivElement;
  stats: HTMLDivElement;
  biome: HTMLDivElement;
  pos: HTMLDivElement;
  weather: HTMLDivElement;
  reticle: HTMLDivElement;
  target: HTMLDivElement;
  /** Time-of-day clock — always visible, not part of the debug overlay. */
  time: HTMLDivElement;
}
Two elements are visible by default:
The reticle (crosshair). A small CSS-drawn cross pinned to screen center,
pointer-events:none, so it marks the block under the camera without ever intercepting a click:// ── from crafty/ui/hud.ts ── reticle.innerHTML = [ `<div style="...top:50%;width:100%;height:3px;background:#fff;opacity:0.8;..."></div>`, `<div style="...left:50%;width:3px;height:100%;background:#fff;opacity:0.8;..."></div>`, `<div style="...width:7px;height:3px;background:#fff;opacity:0.9;border-radius:50%"></div>`, ].join('');The time-of-day clock. A pill at top-center showing the in-world
HH:MM, driven by the day-night cycle.
Everything else — fps, stats (draws/tris/chunks), biome, pos, weather, and target (the block under the reticle) — forms a debug overlay that is display:none until the player presses X. The debug elements are stacked down the right edge, tucked below the minimap panel so the two HUD corners never collide:
// ── from crafty/ui/hud.ts ──
// FPS counter — positioned below the minimap panel (top-right corner).
const fps = createDebug();
fps.style.cssText = [
  'position:fixed', 'top:248px', 'right:12px',
  'font-family:ui-monospace,monospace', 'font-size:13px',
  'color:#ff0', 'background:rgba(0,0,0,0.85)', 'padding:4px 8px',
  'border-radius:4px', 'pointer-events:none',
].join(';');
Because the elements are created once, the per-frame cost of the HUD is just a handful of textContent assignments — no reconciliation, no garbage. The bottom edge of the main screen is owned by the inventory hotbar and its control-button row, which we look at next.
20.3 The Inventory Hotbar#
The hotbar (crafty/ui/hotbar.ts, createHotbar()) is the row of nine block slots centered along the bottom of the screen, plus the trailing row of action buttons. The slot set is a plain array of block types:
// ── from crafty/ui/hotbar.ts ──
const HOTBAR_SLOTS: BlockType[] = [
  BlockType.DIRT, BlockType.IRON, BlockType.STONE, BlockType.SAND,
  BlockType.TRUNK, BlockType.SPRUCE_PLANKS, BlockType.GLASS,
  BlockType.TORCH, BlockType.WATER,
];
The bar itself is the Litecraft hotbar.png sprite, scaled 2× with image-rendering:pixelated; a second copy of the sprite's 24×24 selector cell is a separate overlay element that slides over the active slot with a short CSS transition. Each slot draws its block icon by blitting the block's side-face tile out of the texture atlas onto a per-slot <canvas>:
// ── from crafty/ui/hotbar.ts ──
const tod = blockTextureOffsetData.find(d => d.blockType === HOTBAR_SLOTS[i]);
ctx2.imageSmoothingEnabled = false;
ctx2.drawImage(img, tod.sideFace.x * TILE, tod.sideFace.y * TILE, TILE, TILE, 0, 0, 32, 32);
Selection has three input paths, all funnelling through updateSelection() (which repositions the selector overlay and fires the change callback):
Number keys 1–9 select a slot directly.
The mouse wheel cycles through slots, wrapping at both ends:
// ── from crafty/ui/hotbar.ts ──
window.addEventListener('wheel', (e) => {
  selected = (selected + (e.deltaY > 0 ? 1 : N - 1)) % N;
  updateSelection();
}, { passive: true });
Clicking a slot selects it.
The Control Button Row#
To the right of the bar, createHotbar lays out a row of fixed-position buttons, each repositioned relative to its neighbor on resize and on first layout (requestAnimationFrame):
| Button | Key | Action |
|---|---|---|
| 💡 | F | Toggle flashlight (desktop only) |
| 🏃 | R | Toggle run |
| 🎒 | E | Open the inventory menu (§20.4) |
| ⚙ | ESC | Open the system menu (§20.5) |
| 💬 | T | Open chat (multiplayer only) |
The buttons exist so touch devices — which have no physical keyboard for the hotkeys — can reach every action, and the game hides the ones that don't apply (chat in single-player, flashlight/run on mobile). Touch reliability is handled by also firing on touchend, since some mobile browsers delay or drop the synthetic click:
// ── from crafty/ui/hotbar.ts ──
chatBtn.addEventListener('touchend', (e) => {
  e.preventDefault();
  onChatToggle?.();
}, { passive: false });
The hotbar exposes getSelected(), getSelectedSlot(), setSelectedSlot(), and setOnSelectionChanged() so the game loop knows which block to place and the inventory menu can stay in sync.
20.4 The Inventory Menu#
Pressing E (or the 🎒 button) opens the inventory menu — a full block picker built by createBlockManager() in crafty/ui/block_manager.ts and mounted inside a menu card (the same modal primitive as the system menu, §20.5). It has two regions over the new_inventory.png background sprite: a scrollable grid of every placeable block, and a draggable copy of the nine hotbar slots.
The grid lists every block the code generator marks placeable (air, water, fire, command blocks, and weathering variants are filtered out):
// ── from crafty/ui/block_manager.ts ──
const allBlocks: BlockType[] = [];
for (let i = 1; i < BLOCK_TYPE_COUNT; i++) {
  if (isBlockPlaceable(i as BlockType)) {
    allBlocks.push(i as BlockType);
  }
}
With hundreds of block types the grid must scroll, so it lives in a clipped viewport (21 columns × 6 visible rows) over a tall content div whose inventory_cell.png background tiles one grid cell per slot. One subtlety: the wheel event over the grid is stopped so it scrolls the grid instead of bubbling up to the window-level handler that cycles the hotbar selection:
// ── from crafty/ui/block_manager.ts ──
invScroll.addEventListener('wheel', (e) => { e.stopPropagation(); }, { passive: true });
There are three ways to assign blocks:
- Click a grid block to drop it into the currently selected hotbar slot.
- Drag a grid block onto a hotbar slot to copy it there.
- Drag one hotbar slot onto another to swap them.
The drop handler distinguishes copy from swap by whether the drag originated in the hotbar (dragHotbarIdx):
// ── from crafty/ui/block_manager.ts ──
div.addEventListener('drop', (e) => {
  e.preventDefault();
  if (!dragBlock) {
    return;
  }
  if (dragHotbarIdx !== null && dragHotbarIdx !== i) {
    // swap two hotbar slots
    [hotbarSlots[i], hotbarSlots[dragHotbarIdx]] = [hotbarSlots[dragHotbarIdx], hotbarSlots[i]];
  } else if (dragHotbarIdx === null) {
    hotbarSlots[i] = dragBlock;          // copy from the grid
  }
  syncHotbar();
  onHotbarChanged();
  dragBlock = null; dragHotbarIdx = null;
});
Because the inventory menu and the on-screen hotbar share the same hotbarSlots array, syncHotbar() redraws the in-panel row and onHotbarChanged() lets the game persist the loadout and refresh the live bar. refreshSlotHighlight() outlines the active slot so the player can see which slot a clicked block will land in.
20.5 The System Menu#
The system menu is the pause/settings screen, opened with ESC (or the ⚙ button). It and the inventory menu are both instances of one small modal primitive, createMenu() in crafty/ui/menu.ts:
// ── from crafty/ui/menu.ts ──
export interface MenuConfig {
  title: string;
  /** Optional key code (e.g. 'KeyE') that toggles the menu. ESC always closes. */
  toggleKey?: string;
  /** Auto-open on pointer-lock release (pause-on-ESC behavior). */
  autoOpenOnPointerLockLoss?: boolean;
  /** Prepend a "Resume Game (ESC)" button under the title. */
  showResumeButton?: boolean;
  onOpen?: () => void;
  onClose?: () => void;
}
The game creates two menus from this one primitive — the system menu (a Resume button, opened from the ⚙ button and the game's pause handling) and the inventory menu (toggled with E, hosting the block manager from §20.4). Opening the inventory menu closes the system menu so only one card is ever up:
// ── from crafty/main.ts ──
const systemMenu = createMenu(canvas, hud.reticle, {
  title: 'CRAFTY',
  showResumeButton: true,
  onOpen: trackMenuActivity,
  onClose: trackMenuActivity,
});
const invMenu = createMenu(canvas, hud.reticle, {
  title: 'INVENTORY',
  toggleKey: 'KeyE',
  onOpen: () => {
    trackMenuActivity();
    systemMenu.close();
  },
  onClose: trackMenuActivity,
});
A menu is a dimmed full-screen overlay holding a centered card. Opening it hides the reticle and exits pointer lock so the cursor is usable; closing it (via ESC, the × button, or the Resume button) re-acquires lock so the player drops straight back into the game:
// ── from crafty/ui/menu.ts ──
function toggle(): void {
  if (isOpen()) {
    if (performance.now() - menuOpenedAt < 200) {
      return;                                  // debounce
    }
    close();
    try { void canvas.requestPointerLock(); } catch { /* touch */ }
  } else {
    open();
    if (document.pointerLockElement === canvas) {
      document.exitPointerLock();
    }
  }
}
For a true pause-on-release menu, the primitive also offers an autoOpenOnPointerLockLoss flag: when set, the menu pops itself open whenever the browser breaks pointer lock (the user pressed ESC, or alt-tabbed) and dismisses itself when the user clicks back into the canvas:
// ── from crafty/ui/menu.ts ──
if (config.autoOpenOnPointerLockLoss) {
  document.addEventListener('pointerlockchange', () => {
    if (_suppressAutoOpen) {
      return;
    }
    if (document.pointerLockElement === canvas) {
      close();
    } else {
      open();
    }
  });
}
The card's body is filled with the settings controls from crafty/ui/control_panel.ts — labeled groups of ON/OFF effect toggles plus a few richer row widgets: a master-volume control, a time-of-day pause/scrub slider, and an ambient-occlusion method selector. Those generic row builders (createSettingsSelector, createVolumeControl, createTimeControl, createControlPanel) are covered in Chapter 15; here they are simply appended into the system-menu card.
20.6 The Minimap#
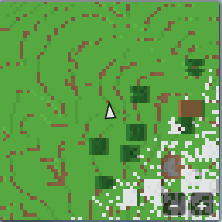
The minimap (crafty/ui/minimap.ts) is a north-up overhead map fixed to the top-right corner. It paints the highest non-air block of every surrounding column in that block's color, scrolls smoothly with the player, and overlays a facing arrow plus markers for networked players.
Lazy, cached terrain sampling. Walking the voxel world every frame for a 256-column-wide window would be far too expensive, so terrain is sampled lazily and cached per world column (the cache is zoom-independent — it stores the top block's height and packed color):
// ── from crafty/ui/minimap.ts ──
/** Returns topY*0x1000000 + sRGB, or undefined for an empty/unloaded column. */
private sampleColumn(wx: number, wz: number, maxY: number): number | undefined {
  const topY = this.world.getTopBlockY(wx, wz, maxY);
  if (topY <= 0) {
    return undefined;
  }
  const bt = this.world.getBlockType(wx, topY - 1, wz);
  if (isBlockWater(bt)) {
    return topY * 0x1000000 + WATER_RGB;
  }
  if (bt === BlockType.GRASS) {
    return topY * 0x1000000 + GRASS_RGB;
  }
  const [lr, lg, lb] = getBlockColor(bt);
  // getBlockColor returns linear RGB for the HDR pipeline; the 2D canvas wants sRGB.
  return topY * 0x1000000 + ((Math.round(linearToSrgb(lr) * 255) << 16) | /* g | b */ 0);
}
Water and grass are special-cased to fixed colors: the atlas grass tile is grayscale (biome-tinted only at render time) and the water tile averages to a murky color, both of which would read poorly on a flat map. Every other block is converted from the engine's linear HDR color back to sRGB bytes via linearToSrgb, the inverse of the transfer used by getBlockColor.
To keep first-open and teleports from stalling a frame, each refresh samples at most SAMPLE_BUDGET new columns; if it runs out it stays "dirty" and fills the remainder over subsequent frames. A west-neighbor height comparison adds cheap relief shading so terrain reads as 3D.
Smooth scrolling. The cached raster is snapped to integer columns, but the panel blits it with a sub-block fractional offset so the map glides under a centered player instead of jumping column by column:
// ── from crafty/ui/minimap.ts ──
const originX = center - (this.radius + (playerX - cx)) * scale;
const originZ = center - (this.radius + (playerZ - cz)) * scale;
ctx.imageSmoothingEnabled = false;
ctx.drawImage(this.offscreen, originX, originZ, this.size * scale, this.size * scale);
Overlays. The cheap overlay layer redraws every frame so the markers stay smooth even when the terrain raster doesn't change. It draws a white facing arrow at center (rotated by the player's yaw), and — when networking is active — a dot per remote player, with off-map players clamped to the panel edge as a triangle that points the way and a name + distance label (this ties into remote-player tracking from Chapter 23).
Zoom and invalidation. Three radii (128/64/32 blocks) are cycled with the −/+ buttons (re-enabled for pointer events even though the panel is click-through). When the local player edits a block, or a chunk re-meshes from streaming or a remote edit, the affected columns are dropped from the cache so the map refreshes:
// ── from crafty/ui/minimap.ts ──
const ZOOM_LEVELS = [128, 64, 32];

/** Re-sample a single column on the next refresh (call on local block edits). */
invalidateColumn(wx: number, wz: number): void {
  this.cache.delete(`${Math.floor(wx)},${Math.floor(wz)}`);
  this.dirty = true;
}
A soft cache cap bounds memory on long treks, and setVisible() / toggle() let the player hide the panel entirely.
20.7 Summary#
Crafty's in-game UI is deliberately low-tech and built entirely from the DOM:
- One layer, careful routing — every screen is a
document.bodyoverlay over the canvas;pointer-events:noneon passive HUD elements keeps gameplay input flowing to the canvas, while interactive controls opt back in. - The main screen (
hud.ts) — an always-on reticle and time clock, plus an X-toggled debug overlay; the game only writestextContenteach frame. - The inventory hotbar (
hotbar.ts) — nine atlas-drawn block slots driven by number keys, wheel, and clicks, with a touch-friendly control-button row (flashlight, run, inventory, menu, chat). - The inventory menu (
block_manager.ts) — a scrollable picker of every placeable block plus click-to-assign and drag-to-swap onto a shared hotbar model. - The system menu (
menu.ts) — a reusable modal that drives pointer lock for pause-on-ESC, hosting the settings controls. - The minimap (
minimap.ts) — a lazily-sampled, column-cached, relief-shaded overhead map that scrolls smoothly and overlays the player arrow and remote-player markers.
Further reading:
crafty/ui/hud.ts— main-screen HUD elementscrafty/ui/hotbar.ts— inventory hotbar + control buttonscrafty/ui/block_manager.ts— inventory menu (block picker, drag/drop)crafty/ui/menu.ts— modal primitive for the system and inventory menuscrafty/ui/control_panel.ts— settings row widgets (Chapter 15)crafty/ui/minimap.ts— north-up minimapcrafty/ui/start_screen.ts— pre-game launcher (Chapter 15)